The sensor maintenance dance unfolds with a choreographed question: how to clean robot vacuum sensor? It’s a routine to ensure your cleaning companion’s perception remains sharp.
Picture this: your diligent robot vacuum relies on sensors for navigation, and the question arises. In just a couple of lines, the answer sweeps in like a sensor revelation: use a soft, dry cloth to gently clean the sensors, ensuring unobstructed sight.
But before you assume it’s a complex routine, join us on this exploration. We’ll guide you through the steps, ensuring your robot vacuum maintains its sensor precision for efficient cleaning.
How Do Robot Vacuum Sensors Work
Now let’s dive into understanding how your robot vacuum’s sensors work and how they play a crucial role in navigating your home and detecting obstacles!
Robot vacuums are equipped with various types of sensors that allow them to effectively maneuver around your home.
One common type of sensor is the proximity sensor, which uses infrared or laser technology to detect nearby objects and obstacles. These sensors emit a beam and measure the time it takes for the beam to bounce back, allowing the vacuum to calculate its distance from objects.
Another important sensor is the cliff sensor, which helps the vacuum detect stairs or other drop-offs to prevent them from falling. These sensors use infrared or ultrasonic technology to detect changes in surface height.
Additionally, some robot vacuums may have floor tracking sensors that can detect different floor types and adjust their cleaning settings accordingly. These sensors work together to create a map of your home and enable the vacuum to navigate around furniture, walls, and other obstacles with ease.
How Many Sensors Are Built Into Robotic Vacuum Cleaners?
Robotic vacuum cleaners are equipped with various sensors to navigate and clean efficiently. Some of the key sensors used in these vacuum cleaners include ultrasonic time-of-flight sensors, which help determine the distance to obstacles and guide the robot’s movement.
Additionally, pressure sensors are used to estimate the level of dust inside the dustbin, ensuring optimal cleaning performance.
Other sensors, such as thermistors, monitor the temperature of the environment, and motor controllers regulate the wheels’ movement, ensuring accurate navigation and cleaning
These sensors work together to provide the robot vacuum with the necessary information to navigate and clean a room effectively. For example, the ultrasonic time-of-flight sensor helps the robot identify obstacles and adjust its path accordingly, while the pressure sensor monitors the dustbin’s fill level and adjusts the cleaning process accordingly.
This combination of sensors allows the robot vacuum to efficiently clean various types of flooring and adapt to different environments, making it a versatile and convenient cleaning solution.
Why Cleaning Sensors Matters
To keep your robotic helper performing at its best, it’s crucial to ensure that its vision remains unobstructed and free from any pesky particles or grime. Dirty sensors can significantly affect the performance of your robot vacuum, leading to navigation issues and obstacles being missed.
When sensors are covered in dirt or debris, they may not be able to accurately detect walls, furniture, or other objects in the room, resulting in collisions and potential damage to both the vacuum and your belongings.
Additionally, dirty sensors can also impact the vacuum’s ability to properly navigate and map the room, leading to inefficient cleaning patterns and missed areas. Regularly cleaning the sensors of your robot vacuum is essential to maintain its optimal performance and ensure that it can effectively navigate and clean your home.
How To Clean Robot Vacuum Sensor – Explained
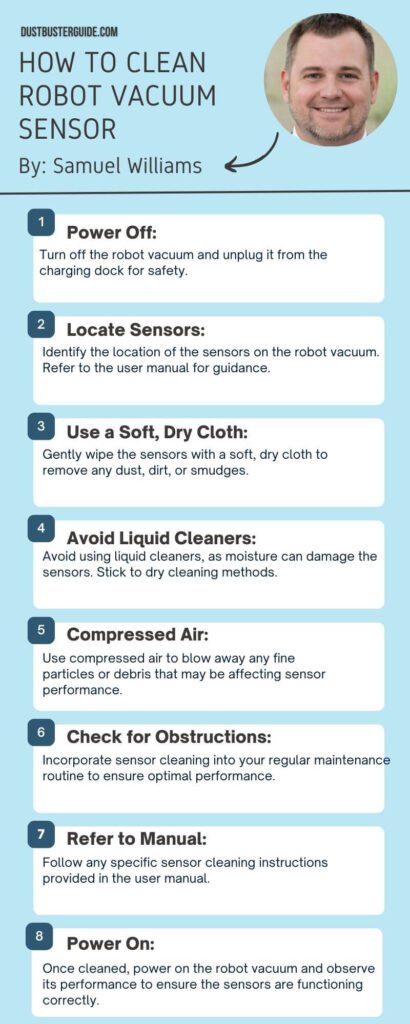
Follow the mentioned steps to clean your robot vacuum sensors efficiently:
Materials Needed
Ensure your robotic helper’s vision remains unobstructed and at its peak performance by gathering the necessary supplies for a safe and effective cleaning process. To clean the sensors of your robot vacuum, you’ll need a few basic cleaning supplies.
- Firstly, you’ll need a soft, lint-free cloth or microfiber cloth to wipe the sensors gently. Avoid using abrasive materials that could scratch or damage the sensors.
- Additionally, you may want to have a can of compressed air to blow away any loose dirt or debris that may be stuck in the sensors. This can help to dislodge any particles that are difficult to remove with a cloth alone.
- Finally, it’s a good idea to have some rubbing alcohol or a mild cleaning solution on hand to sanitize the sensors and remove any stubborn grime.
Remember to always follow the manufacturer’s guidelines and instructions when cleaning your robot vacuum’s sensors to ensure a safe and effective cleaning process.
Preparing The Robot Vacuum
Before you dive into the cleaning process, it’s crucial to safely power down your trusty robotic helper and take precautions to prevent any accidental starts during the maintenance. To do this, start by locating the power button or switch on your robot vacuum and ensure it is in the “off” position.
This will ensure that the vacuum won’t accidentally start while you are cleaning its sensors.
Additionally, you can unplug the vacuum from its charging dock or remove the battery to provide an extra layer of safety. By taking these steps, you can confidently clean the sensors of your robot vacuum without worrying about any unexpected starts.
Cleaning External Sensors
Now that you’ve powered down your trusty robotic helper, let’s explore the various external sensors and how to give them a thorough cleaning.
Your robot vacuum is equipped with different sensors located on its exterior, including the cliff sensors, bumper sensors, and camera sensors.
To clean the cliff sensors, locate them on the underside of the vacuum near the edges. Gently wipe them using a clean, dry cloth to remove any dirt or debris that may be blocking them.
For the bumper sensors, which are usually found on the front of the vacuum, use a soft cloth or cotton swab dampened with water or a mild cleaning solution to gently wipe away any smudges or dirt.
Lastly, if your vacuum has camera sensors, check the user manual for specific cleaning instructions as these sensors may require special care.
By regularly cleaning these external sensors, you can ensure optimal performance and efficiency from your robot vacuum.
| Sensor Types | Cleaning Steps |
| Cliff Sensors | Locate on the vacuum’s underside near the edges. Gently wipe with a clean, dry cloth to remove dirt/debris. |
| Bumper Sensors | Found on the vacuum’s front. Use the damp cloth/cotton swab with water/mild solution to wipe away smudges. |
| Camera Sensors* | Refer to the user manual for specific cleaning instructions, as they may require special care. |
Dealing With Dust And Debris
To keep your robotic helper in top shape, it’s important to tackle the pesky dust and debris that can accumulate over time. When it comes to cleaning the external sensors on your robot vacuum, dealing with dust and debris is a crucial step.
- Start by gently wiping the sensors using a soft, lint-free cloth or a microfiber cloth. Be careful not to apply too much pressure as this can damage the sensors.
- For hard-to-reach areas, you can use a soft-bristled brush or a can of compressed air to dislodge any stubborn dust.
- Make sure to clean the sensors regularly to ensure optimal performance and accuracy.
By taking the time to remove dust and debris from the sensors, you can ensure that your robot vacuum continues to navigate your home with ease.
Cleaning Optical Sensors
Ensure your robotic helper’s optical sensors are kept clean and clear of any obstructions, allowing for uninterrupted functionality and accurate navigation throughout your home.
When cleaning optical sensors, such as cliff sensors or camera-based sensors, it’s important to follow specific guidelines for each type of sensor.
For cliff sensors, gently wipe the sensor area with a soft, dry cloth to remove any dust or debris that may be blocking the sensor’s function. Avoid using any liquids or abrasive materials that could damage the sensor.
For camera-based sensors, use a microfiber cloth or lens cleaning solution to carefully clean the lens, ensuring that it’s free from smudges or fingerprints. Be gentle and avoid applying excessive pressure to prevent scratching the lens.
Regularly inspect and clean the optical sensors to maintain their effectiveness and prolong the lifespan of your robot vacuum.
Maintaining Infrared Sensors
Regularly checking and maintaining the infrared sensors is crucial for your robotic helper to effectively detect obstacles and navigate around them. Infrared sensors play a vital role in obstacle detection by emitting infrared light and analyzing the reflections to determine the presence of objects.
To ensure optimal performance, you should clean the infrared sensors regularly.
Start by gently wiping the sensors with a soft, lint-free cloth to remove any dust or debris that may have accumulated. Avoid using harsh chemicals or abrasive materials that could damage the sensors.
Additionally, make sure to check the sensors for any signs of physical damage or misalignment. If you notice any issues, consult the user manual or contact the manufacturer for further guidance.
By taking proper care of the infrared sensors, you can ensure that your robot vacuum continues to navigate your home efficiently and avoid any potential obstacles.
Pros Of Maintaining And Cons Of Not Maintaining Infrared Sensors
Caring For Lidar And Laser Sensors
Make sure you take good care of your robot’s lidar and laser sensors to keep them accurate and functioning at their best.
These sensors, commonly found in advanced robot vacuums, play a crucial role in mapping the surroundings and detecting obstacles.
To maintain their accuracy, it’s important to regularly clean them. Start by gently wiping the sensors with a soft, lint-free cloth to remove any dust or debris. Avoid using harsh chemicals or abrasive materials that could damage the sensors.
Additionally, check for any signs of damage or misalignment and make necessary adjustments or repairs.
By following these guidelines, you can ensure that your robot vacuum’s lidar and laser sensors continue to work effectively, allowing it to navigate your home efficiently and avoid any potential obstacles.
What Are The Common Mistakes To Avoid
To prevent any accidental mishaps, it’s crucial to be mindful of certain actions that could potentially harm the delicate components responsible for accurate mapping and obstacle detection.
- Firstly, avoid using harsh cleaning agents or abrasive materials when cleaning the sensor. Instead, opt for a soft, lint-free cloth or a cotton swab lightly dampened with water or a mild cleaning solution.
- Secondly, be gentle when wiping the sensor to avoid applying too much pressure or causing any scratches.
- Additionally, never spray any liquids directly onto the sensor, as this can lead to moisture damage.
- Lastly, avoid touching the sensor with your fingers or any sharp objects, as this can leave fingerprints or cause permanent damage.
By following these guidelines, you can ensure the longevity and effectiveness of your robot vacuum sensors.
How Can You Test The Accuracy Of A Robot Vacuum’s Navigation System
Ensure that your home is obstacle-free by conducting simple tests to confirm the functionality of your robot vacuum’s detection system.
- Start by placing a large object, such as a chair, in the path of the vacuum and observe if it successfully detects and avoids the obstacle.
- Additionally, you can test the boundary sensors by placing a strip of tape on the floor and seeing if the vacuum stops when it reaches the tape.
- If any issues are detected, try cleaning the sensors with a soft, dry cloth to remove any dirt or debris that may be obstructing their functionality.
- If problems persist, consult the user manual or contact customer support for further troubleshooting assistance.
How Often Should You Do Sensor Cleaning
Now that you’ve tested the functionality of your robot vacuum sensors and ensured they’re working properly, let’s talk about the frequency of cleaning these sensors.
Cleaning your robot vacuum’s sensors regularly is essential to maintain their efficiency and effectiveness. Depending on the environment and usage, it’s recommended to clean the sensors at least once a week or more frequently if needed.
Dust, dirt, and debris can accumulate on the sensors over time, hindering their ability to detect obstacles and navigate your home. By cleaning the sensors regularly, you can ensure that your robot vacuum continues to operate at its best, keeping your floors clean and your home tidy.
Conclusion
You must be very happy to find out exactly how to clean robot vacuum sensor. Maintaining clean robot vacuum sensors is vital for peak performance. Understand sensor types, their role, and the risks of dirt accumulation. Dirty sensors lead to mapping errors, reduced efficiency, and obstacle detection problems. Carefully clean external sensors individually, avoiding force or harsh cleaners. Follow specific guidelines for advanced sensors. Test post-cleaning and establish a regular schedule based on dirt exposure. By following these steps, your robot vacuum will navigate and clean effectively.
FAQs
How do different types of sensors in robot vacuums contribute to navigation and obstacle detection?
Different types of sensors in robot vacuums contribute to navigation and obstacle detection by providing information about the environment. For example, proximity sensors detect obstacles, while floor sensors help with surface detection and mapping.
What are the potential issues that can arise from dirty sensors in robot vacuums?
Dirty sensors in robot vacuums can cause navigation problems, decreased obstacle detection, and reduced cleaning efficiency. When sensors become dirty, they may fail to accurately detect and avoid obstacles, leading to potential damage to the vacuum and your home.
What are the basic cleaning supplies required to clean robot vacuum sensors effectively?
To effectively clean robot vacuum sensors, you’ll need a few basic supplies. Start by gathering a soft cloth or microfiber cloth, rubbing alcohol, cotton swabs, and a can of compressed air. These tools will help you remove dirt and debris from the sensors.
How can I safely turn off the robot vacuum to prevent accidental starting during cleaning?
To safely turn off the robot vacuum and prevent accidental starting during cleaning, locate the power button or switch on the vacuum. Press or slide it to the “off” position, ensuring the robot is completely powered down.
How often should I clean the sensors in my robot vacuum?
You should clean the sensors in your robot vacuum at least once a month. Regular maintenance will ensure optimal performance and prevent any issues caused by dirt or debris obstructing the sensors.
How do you clean a robot vacuum lidar?
To clean a robot vacuum’s Lidar sensor, you can use a soft, dry cloth to gently wipe the sensor’s surface. It’s important to avoid using water or cleaning solutions, as they can damage the sensor. Additionally, removing any dust or debris around the sensor’s area can help maintain its effectiveness.
How do modern robot vacuums use sensors and cameras?
Modern robot vacuums use a variety of sensors and cameras for navigation and obstacle detection. One key technology is Lidar (Light Detection and Ranging), which uses laser sensors to map the environment and navigate around objects and furniture, enabling efficient cleaning and obstacle recognition.
External Resources
- Comparing The Recommendations Of Buyers Of Energy-Efficient And Inefficient Vacuum Cleaners – MDPI
- The Best Robot Vacuum You Can Buy Right Now – The Verge
- The Design Methodology To Develop New-Generation Universal-Motors For Vacuum Cleaners – IEEE Xplore
- The Effect Of Vacuum Cleaners On The Concentration And Particle Size Distribution Of Airborne Cat Allergen – The Journal of Allergy and Clinical Immunology