The charging challenge prompts a question of power persistence: how to fix iRobot charging error 8? It’s an exploration into troubleshooting to keep your iRobot charging smoothly.
Picture this: your iRobot flashing an error 8 during charging, and the question arises. In just a couple of lines, the answer charges in like a troubleshooting revelation: Error 8 on iRobot indicates a communication issue between the battery and the robot. Try cleaning the charging contacts, ensuring the battery is correctly seated, or replacing the battery if necessary.
Join us on this exploration for a comprehensive guide to address iRobot charging error 8.
What Is The Roomba Error 8 Code?
So, you’re wondering what exactly the Roomba Error 8 code means, aren’t you? Well, don’t worry, you’re not alone. Many Roomba users have encountered this frustrating error and are left scratching their heads.
The Error 8 code is a common issue that can occur with iRobot Roomba vacuums, and it usually indicates a problem with the charging system.
When your Roomba displays the Error 8 code, it means that there’s an issue with the charging process. This can be caused by a variety of factors, such as a faulty charging dock, a problem with the power supply, or even a malfunctioning battery.
Essentially, your Roomba is having trouble receiving power and is unable to charge properly. This can be a major inconvenience as it means your Roomba won’t be able to complete its cleaning cycles and keep your floors tidy.
Now that you know what the Roomba Error 8 code signifies, it’s time to delve deeper into how you can fix this frustrating issue.
In the following sections, we’ll explore different troubleshooting steps and solutions that can help you resolve the charging error and get your Roomba back up and running efficiently.
So, let’s dive in and find out how to fix the Roomba charging error 8 once and for all.
What Are The Root Causes Of iRobot Charging Error 8
When it comes to Roomba Charging Error 8, there are a few common root causes that could be causing the issue. Below we have addressed all the reason that causes this particular issue so let’s see what these are:
- Firstly, dusty or broken charging connectors
- A malfunctioning base station can also lead to this error code.
- Additionally, improper house wiring
- Lastly, sometimes a temporary system glitch
We’ll now discuss each of these causes in more detail and provide you with the necessary steps to fix them.
Dusty Or Broken Charging Connectors
If your Roomba brush is not spinning, one possible cause could be dusty or broken charging connectors.
Over time, the charging connectors on your Roomba can accumulate dust and debris, which can prevent a proper connection between the robot and the charging dock. When this happens, your Roomba may not charge properly or may not charge at all.
Additionally, the connectors may become bent or damaged, which can also result in charging errors and prevent your brush from spinning.
Malfunctioning Base Station
One possible explanation for the Roomba brush not spinning is a malfunctioning base station. If your Roomba isn’t able to dock properly on the base station, it may not be receiving the necessary charging power. This can lead to various errors, including the charging error 8.
The base station is responsible for providing power to the Roomba and ensuring that it’s charged and ready for use. If the base station is malfunctioning, it can disrupt the charging process and prevent the brush from spinning.
Improper House Wiring
To ensure your Roomba brush spins properly, check if the improper house wiring is causing any issues. Sometimes, the wiring in your home may not be compatible with the Roomba charging system, leading to charging error 8. This error occurs when there’s a communication problem between the Roomba and the charging dock. It can prevent your Roomba from charging properly and ultimately affect the performance of the brush.
One way to determine if improper house wiring is the cause is by checking if other electronic devices in your home are also experiencing similar issues. If you notice that other appliances or devices aren’t functioning correctly or aren’t charging properly, it could be a sign of wiring problems.
In such cases, it’s essential to consult a professional electrician to assess and fix any wiring issues in your home. By resolving the improper wiring, you can ensure that your Roomba is receiving the necessary power to charge and operate efficiently.
Temporary System Glitch
If you’ve been following along, we’ve been discussing the possible reasons why your Roomba brush isn’t spinning. In our previous subtopic, we explored the issue of improper house wiring and how it could potentially affect the functioning of your Roomba.
Now, let’s move on to another potential culprit: a temporary system glitch. Sometimes, even the most advanced technology can experience hiccups, and your Roomba isn’t an exception. A temporary system glitch could be the reason behind the brush not spinning.
This glitch could be caused by a variety of factors, such as a software update that didn’t install properly or a minor malfunction in the robot’s internal components. While it may be frustrating to encounter such a glitch, the good news is that it’s usually an easy fix. So, let’s dive into some possible solutions that can help you resolve this issue and get your Roomba back to its efficient cleaning routine.
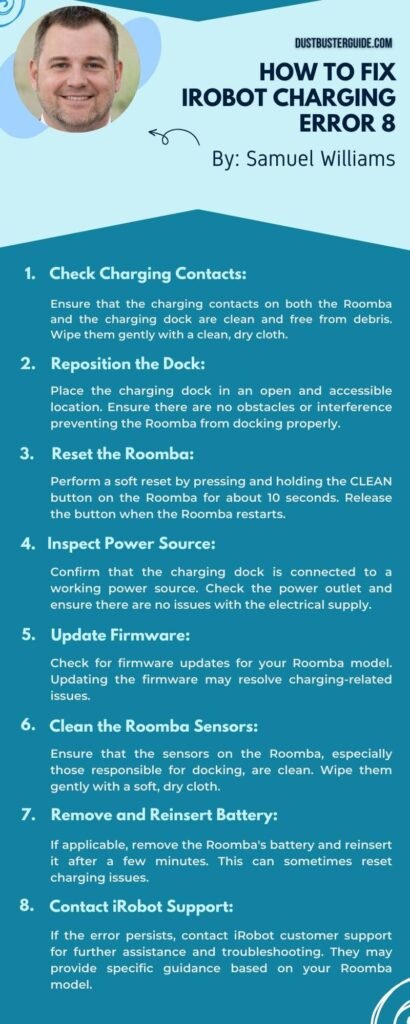
How To Fix iRobot Charging Error 8 – 4 Steps
If you’re experiencing Roomba Charging Error 8, there are a few simple steps you can take to try and fix the issue.
- First, try rebooting your Roomba by turning it off and then back on again.
- Next, check the charging connectors to make sure they’re clean and free from any debris.
- Additionally, clean the motor, and filters, and reset the battery.
- These actions may also help resolve the error.
1. Reboot Your Roomba

One possible way to address the issue of the iRobot charging error 8 is by rebooting your Roomba. Rebooting your Roomba can help reset its system and resolve any temporary glitches that may be causing the charging error.
To reboot your Roomba, start by removing it from the charging dock and flipping it over. Locate the battery compartment and remove the battery. Wait for about 10 seconds before reinserting the battery back into its compartment. Make sure it’s properly aligned and securely inserted.
After that, place your Roomba back on the charging dock and let it charge for at least 16 hours. This extended charging time will provide ample opportunity for the system to reset and recalibrate itself.
If rebooting your Roomba doesn’t fix the charging error 8, there may be other troubleshooting steps you can try. One of the common causes of this error is a dirty charging contact. To clean the charging contact, turn off your Roomba and unplug it from the charging dock.
Take a clean, dry cloth and gently wipe the charging contacts on both the Roomba and the charging dock. Ensure there’s no dust, dirt, or debris obstructing the contact points.
Once cleaned, plug your Roomba back into the charging dock and see if the error persists. If the problem still persists after trying these steps, it may be best to contact iRobot customer support for further assistance.
2. Clean The Charging Connectors
To ensure your Roomba charges properly, make sure you clean the charging connectors regularly. Over time, dust, dirt, and debris can accumulate on the charging connectors, preventing the proper flow of electricity. This can result in charging errors, such as error 8. Cleaning the charging connectors is a simple and effective solution to fix this issue and get your Roomba back up and running.
To clean the charging connectors, follow these steps:
| Step | Instructions |
| 1 | Turn off your Roomba and remove it from the charging dock. |
| 2 | Use a clean, dry cloth to gently wipe the charging contacts on both the Roomba and the dock. |
| 3 | Inspect the charging contacts for any visible dirt or debris. If you notice any, use a small brush or cotton swab to carefully remove it. |
| 4 | Once you’ve cleaned both the Roomba and the dock, place the Roomba back on the charging dock and ensure a secure connection. |
| 5 | Allow your Roomba to charge for at least 3 hours before using it again. |
By regularly cleaning the charging connectors, you can prevent charging errors and ensure that your Roomba charges properly every time. This simple maintenance routine will help keep your Roomba running smoothly and efficiently, so you can enjoy clean floors without any interruptions.
3. Clean The Motor
Regularly cleaning the motor of your Roomba will ensure optimal performance and extend the lifespan of your device. Over time, dust, hair, and debris can accumulate in the motor, causing it to become clogged and preventing the brush from spinning properly.
To clean the motor, start by turning off your Roomba and flipping it over so that the brushes are facing up. Locate the motor compartment, which is usually located near the center of the device.
Using a small brush or a can of compressed air, gently remove any visible debris from the motor compartment. Be careful not to damage any of the delicate components inside. If there are any stubborn clumps of dirt or hair, you can use a pair of tweezers to carefully remove them.
Once the motor compartment is clean, you can also use a cloth or sponge dampened with a mild cleaning solution to wipe down the surrounding area and remove any lingering dirt or grime.
After cleaning the motor, make sure to let it dry completely before reassembling your Roomba. This will help prevent any moisture from damaging the internal components.
Once everything is dry, carefully reattach the motor compartment and flip your Roomba back over. You should now notice a significant improvement in the performance of your device, with the brush spinning freely and effectively picking up dirt and debris from your floors.
By regularly cleaning the motor of your Roomba, you can ensure that it continues to work efficiently and effectively, keeping your home clean and tidy.
4. Clean The Filters
Keeping the filters of your Roomba clean is essential for maintaining optimal performance and prolonging the lifespan of your device. Over time, dust, dirt, and debris can accumulate on the filters, causing them to become clogged. This can result in reduced suction power and inefficient cleaning. To ensure that your Roomba operates at its best, it’s important to regularly clean the filters.
To clean the filters, start by locating them on your Roomba. Depending on the model, you may find the filters on the side or back of the device. Once you’ve located the filters, remove them from the Roomba.
Take a moment to inspect the filters for any visible debris or dirt. If you notice any build-up, gently tap the filters against a hard surface to dislodge the trapped particles.
Alternatively, you can use a soft brush or a can of compressed air to remove the debris.
After cleaning, make sure to thoroughly rinse the filters under running water until the water runs clear. Allow the filters to air dry completely before reinstalling them into the Roomba. Regularly cleaning the filters of your Roomba is essential for maintaining its performance and functionality.
By keeping the filters clean, you can ensure that your Roomba continues to operate efficiently, providing you with a clean and tidy home.
So, take the time to clean the filters regularly and enjoy the benefits of a well-performing Roomba.
4. Reset The Battery
If you want to ensure optimal performance and prolong the lifespan of your Roomba, resetting the battery is a simple yet effective step. When your Roomba encounters charging error 8, it could be due to a communication issue between the battery and the robot. Resetting the battery can help resolve this problem and get your Roomba back to its cleaning duties.
To reset the battery, start by removing it from the robot. Locate the battery release tabs on the sides of the robot and gently pull them to release the battery. Once the battery is out, press and hold the power button on the robot for about 15 seconds. This will discharge any remaining power in the system and reset the battery.
Afterward, reinsert the battery into the robot until it clicks into place securely. Make sure the battery is properly aligned with the contacts and the release tabs are fully engaged.
Finally, place your Roomba on the charging dock and let it charge for at least 24 hours to ensure a full and proper reset.
Resetting the battery can often resolve charging error 8 and allow your Roomba to function normally again. It’s a simple troubleshooting step that can save you time and money by avoiding unnecessary repairs or replacements.
By following these steps, you can keep your Roomba running smoothly and efficiently, ensuring a clean home without any charging issues.

What To Do If This Does Not Fix Roomba Error 8
However, despite trying all the troubleshooting methods, your Roomba may still not be fixing the charging issue. Here are some reasons why this might be happening:
- Damaged charging contacts: One possible reason why your Roomba is still not fixing the charging issue could be due to damaged charging contacts. Over time, these contacts can become dirty or worn out, preventing a proper connection between the Roomba and the charging dock. In such cases, you may need to clean the charging contacts or replace them altogether.
- Faulty power supply: Another reason for the persistent charging issue could be a faulty power supply. If the power supply does not provide enough voltage or current to properly charge the Roomba, it may result in the charging error 8. To determine if this is the case, try using a different power supply or charging dock to see if the problem persists.
- Battery failure: The battery of your Roomba may also be the culprit behind the charging issue. If the battery is old or faulty, it may not hold a charge properly or fail to charge at all. In such cases, you may need to replace the battery with a new one to resolve the problem.
- Internal component malfunction: Sometimes, the charging issue may be a result of an internal component malfunction. If there is a fault in the circuitry or other internal components of the Roomba, it can prevent proper charging. In such cases, it’s recommended to contact iRobot customer support or take your Roomba to a professional technician for further inspection and repair.
By considering these possible reasons, you can troubleshoot and identify the underlying cause of your Roomba’s persistent charging issue.
My Roomba Is Beeping Continuously During Charging; What Does It Mean?

Wondering why your Roomba is beeping continuously while it’s charging? Let’s explore the reasons behind this and how to fix it.
One possible reason for your Roomba beeping during charging is that it’s encountered an error. The beeping sound is an indication that something isn’t right with the charging process. It could be due to a faulty battery or a problem with the charging dock.
To fix this, try the following steps:
- Check the battery: Make sure the battery is properly inserted and securely connected to the Roomba. If it’s loose or damaged, consider replacing it with a new one.
- Clean the charging contacts: Over time, dust and debris can accumulate on the charging contacts, preventing proper connection. Use a soft cloth or cotton swab to gently clean the contacts on both the Roomba and the charging dock.
- Reset the Roomba: Sometimes, a simple reset can solve the beeping issue. Press and hold the Clean button on your Roomba for about 10 seconds until it restarts.
If the beeping persists even after trying these steps, there might be a more serious issue with your Roomba. It’s recommended to contact iRobot customer support for further assistance. They’ll be able to provide you with specific troubleshooting steps or guide you through the repair process.
A continuously beeping Roomba during charging indicates an error in the charging process. By checking the battery, cleaning the charging contacts, and resetting the Roomba, you can potentially fix this issue. However, if the problem persists, it’s best to seek professional help from iRobot customer support. Don’t let the beeping sound go unanswered; take action to ensure your Roomba is charging properly and ready to clean your home efficiently.
How Do I Know If My iRobot Battery Is Bad?
If you suspect that your iRobot battery is bad, there are several signs to look out for. One of the most common signs is reduced run time, where the robot vacuum runs for a shorter period than usual before requiring a recharge.
Additionally, if the robot vacuum is not charging or is not holding a charge, it may be a sign that the battery is bad and needs replacement. If you encounter any charging errors, such as charging error one (1), which means the robot cannot detect the battery, it may also indicate a battery issue.
If you experience any of these issues, it’s recommended to contact iRobot customer support for assistance in identifying and addressing the issue. Additionally, it’s important to use genuine iRobot replacement batteries to ensure the continued proper functioning of your robot vacuum.
Conclusion
So now we know how to fix iRobot charging error 8. While dealing with the iRobot charging error 8 can be frustrating, following the correct troubleshooting steps can help you resolve the issue. This error typically indicates a problem with the charging system, which could be due to a dirty charging base or a faulty battery. By addressing these issues and following the steps outlined in this article, you can get your Roomba back to its cleaning duties. If the error persists despite your efforts, consider contacting iRobot customer support for additional assistance. Don’t let this error disrupt your clean and tidy home with your Roomba!
FAQs
Can a Roomba charging error 8 be fixed without professional help?
Yes, you can fix a Roomba charging error 8 without professional help. By following a few simple steps, you can troubleshoot and resolve the issue yourself. Let’s explore the common causes and solutions to get your Roomba back up and running in no time.
Is there a way to prevent Roomba charging error 8 from occurring?
To prevent Roomba charging error 8, you should regularly clean the charging contacts on both the robot and the home base. Additionally, ensure that the robot is properly aligned with the charging dock and that there are no obstructions preventing a proper connection.
How long does it usually take to fix Roomba charging error 8?
Are you tired of your Roomba brush not spinning? It can be frustrating when your trusty cleaning companion isn’t doing its job properly. In this article, we will explore the possible causes of this issue and provide you with simple solutions to fix it. Stay tuned!
Are there any alternative methods to fix Roomba charging error 8?
Looking for alternative methods to fix Roomba charging error 8? You’re in luck! In this article, we’ll explore different solutions to resolve this common issue. So, if you’re tired of dealing with a non-charging Roomba, keep reading to discover effective fixes.
Can Roomba charging error 8 affect the performance of the robot in other ways?
Roomba charging error 8 can have a significant impact on the performance of your robot. It may not only affect the charging process but also other functions, such as the brush not spinning. Discover the potential consequences and learn how to fix this error.
How do I fix my Roomba charging station?
To fix a Roomba charging station, ensure that the charging contacts are clean and free of debris and that the power outlet is working correctly. If the issue persists, try resetting the Roomba battery by holding down the CLEAN button for 10 seconds or until the display reads “rSt”.
How do I reset my iRobot battery?
To reset an iRobot battery, press and hold the CLEAN button for 10 seconds or until the display reads “rSt.” Release the button and let the Roomba charge for at least 12 hours or until the CLEAN button lights up green.
External Resources
- Consumer Buying Behaviour Of Sustainable Vacuum Cleaners – Consequences For Design And Marketing – ScienceDirect
- The Vacuum Cleaner A History By Carroll Gantz
- Rogue Robotic Vacuum Cleaner Causes $3.5k Worth Of Damage, Tribunal Hears – New Zeland Herald
- The Life And Death Of A Robot Vacuum – TechCrunch

