The bristle breakdown brings forth a question of troubleshooting: how to fix Deebot main brush malfunction? It’s an exploration into rectifying issues that hinder the primary cleaning component.
Picture this: your Deebot encountering main brush malfunctions, and the question arises. In just a couple of lines, the answer sweeps in like a troubleshooting revelation: First, ensure the main brush is free from entanglements.
If the issue persists, check for any blockages in the brush compartment or replace the brush if damaged. Additionally, inspect the main brush module and its connection points for any issues. Join us on this exploration for a step-by-step guide to revive your Deebot’s main brush functionality.
How Does The Main Brush Work
It’s truly amazing how the main brush of your Deebot plays such a crucial role in keeping your home squeaky clean, isn’t it? This essential part of your robotic vacuum cleaner does the heavy lifting when it comes to pulling up dirt, dust, and debris from your floors.
Even the tiniest speck of dust doesn’t stand a chance against the rotating bristles of the main brush. It’s designed to reach into the smallest crevices, ensuring that no spot is missed in the cleaning process.
The main brush doesn’t act alone, though. It works in harmony with the side brushes and the vacuum suction to deliver a thorough clean. The side brushes sweep dirt and debris into the path of the main brush, which then lifts and removes these particles from the surface.
This debris is then sucked into the dustbin by the vacuum suction. So, when the main brush malfunctions, it can significantly impact the Deebot’s cleaning performance. But don’t worry, fixing a malfunctioning main brush is something you can handle with a little guidance.
What Are The Common Causes Of Main Brush Malfunction
Picturing your robotic vacuum cleaner going haywire and spinning in circles instead of dutifully cleaning your floors? You might be dealing with a central sweeper issue.
The main brush of your Deebot plays a critical role in the overall functioning of the device. It’s a primary cleaning component that spins to sweep up dirt and dust from your floors. When this main brush malfunctions, it could seriously hamper the cleaning performance of your Deebot.
Understanding the common causes of this issue can help you to diagnose and potentially fix the problem.
The most common cause of main brush malfunction is typically an accumulation of hair, dust, or debris that gets tangled around the brush. This could prevent the brush from spinning properly and lead to inefficient cleaning.
Another possible cause could be a worn-out or damaged brush that needs replacement. Wear and tear are normal for any mechanical device, and your Deebot is no exception.
Also, software glitches can sometimes cause the main brush to behave erratically. These issues can range from simple malfunctions to more complex system errors.
How To Fix Deebot Main Brush Malfunction: Step-By-Step
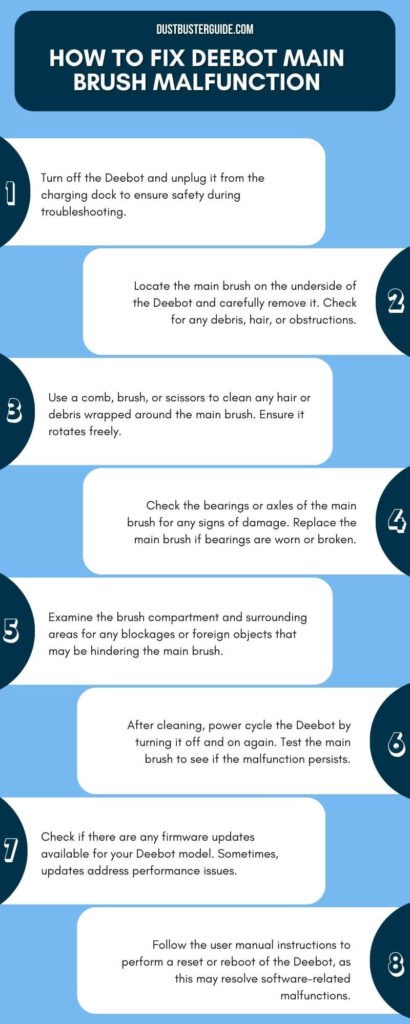
Follow these step-by-step instructions to troubleshoot and fix the main brush malfunction:
Step 1: Power Off The Deebot
Make sure the Deebot is turned off and disconnected from the charging dock to avoid any accidents during troubleshooting.
Step 2: Remove The Main Brush
- 1. Locate the main brush compartment on the underside of the Deebot.
- 2. Use a screwdriver or your fingers (depending on the model) to remove the screws or clips securing the main brush compartment.
- 3. Carefully lift out the main brush from the compartment.
Step 3: Clean The Main Brush
- 1. Remove any tangled hair, strings, or debris from the main brush using your fingers or a pair of scissors.
- 2. Use a small brush or a toothbrush to clean the bristles thoroughly.
- 3. Inspect the brush bearings for any dirt or debris. Remove it using a toothpick or a cotton swab.
Step 4: Check The Main Brush Motor
- 1. Locate the main brush motor, which is usually near the main brush compartment.
- 2. Gently rotate the motor with your fingers to check if it moves freely. If it feels stuck or makes unusual noises, the motor may need to be replaced.
Step 5: Reassemble The Main Brush
- 1. Place the cleaned main brush back into the compartment.
- 2. Secure the main brush compartment with the screws or clips.
Step 6: Test The Deebot
- 1. Place the Deebot back on the charging dock and turn it on.
- 2. Start a cleaning cycle and observe if the main brush is functioning properly.
How To Replace The Main Brush
When your robotic vacuum isn’t working as it should, knowing how to replace the primary sweeping component can be a real lifesaver. The main brush of your Deebot vacuum is a crucial part that gathers dust and debris, enabling the vacuum to clean efficiently. Over time, wear and tear can cause this component to malfunction, significantly reducing your Deebot’s cleaning ability.
Replacing the main brush is relatively straightforward and can be completed with a couple of tools and a few minutes of your time.
Firstly, make sure your Deebot is powered off and unplugged from any charging dock. Turn it over and locate the main brush compartment. You’ll typically find this in the middle of the vacuum’s underside.
Gently release the retaining clips or screws holding the brush cover in place, and remove the cover. This will reveal the main brush.
Remove the malfunctioning brush, taking care not to damage any surrounding parts, and replace it with a new one.
Once the new brush is securely in place, replace the cover and secure it with the retaining clips or screws. Turn your Deebot back on and test it out on a small area to ensure the new brush is functioning correctly.
With this simple process, you can extend the life of your Deebot and maintain its cleaning efficiency.
| Steps | Description |
| 1. Power Off and Unplug | Turn off and unplug the Deebot. |
| 2. Locate Brush Compartment | Find the main brush compartment underneath. |
| 3. Remove the Brush Cover | Release clips/screws and take off the cover. |
| 4. Remove Old Brush | Take out the old brush carefully. |
| 5. Replace with New Brush | Install the new brush securely. |
| 6. Secure Cover | Reattach the cover and secure it. |
| 7. Power On and Test | Turn on and test the Deebot. |
Tips For Regular Maintenance

To keep your robotic vacuum in top shape, regular maintenance is essential and can save you from potential headaches down the line.
- Cleaning the main brush regularly can help prevent debris accumulation that could lead to a malfunction. Ideally, you should consider cleaning the brush after every use, especially if your Deebot has been cleaning a particularly dirty area.
- Inspect the main brush for signs of wear and tear. If the bristles are worn out or damaged, it’s time to replace the brush to ensure optimal performance.
- Another crucial aspect of maintenance is taking care of the robot’s sensors. These sensors guide your Deebot, helping it navigate around your home and avoid obstacles. Make sure to clean these sensors with a dry cloth to remove any dust or grime that might interfere with their operation.
- Don’t forget to regularly empty the dustbin and replace the filter as per the manufacturer’s instructions.
- Lastly, ensure that your Deebot is always charged adequately. A well-maintained Deebot not only functions better but also has a longer lifespan.
When To Seek Professional Help
Despite your best efforts in regular maintenance, there’ll come a time when your robotic vacuum may need a professional’s touch. It’s important to recognize when your DIY efforts are not enough and a professional hand is required.
Certain issues like complex motor problems, circuit malfunctions, or serious issues with the main brush that persist despite your best attempts at fixing them may warrant a call to a professional repair service. Not only will this save you time, but it could also prevent further damage to your Deebot.
In some cases, your Deebot’s warranty may cover these repairs, which means you won’t have to bear the cost. Check your warranty information carefully before attempting any serious repairs yourself. Some manufacturers may void the warranty if unprofessional tinkering is detected.
Remember, it’s always better to be safe than sorry. If you’re unsure, reach out to the manufacturer’s customer service for help, they can guide you and suggest the best course of action.
Recap And Additional Resources
You’ve come a long way in understanding how to take care of your robotic vacuum, and it’s worth a moment to pat yourself on the back. You’ve mastered the process of troubleshooting, cleaning, and even replacing the main brush of your Deebot. Remember, maintaining your Deebot regularly will extend its lifespan and keep it running efficiently.
You now know the signs that indicate when it’s time to seek professional help, and this knowledge can save you from unnecessary stress and expenses.
For further reference and assistance, you can always refer back to this guide. Additionally, consider checking out the manufacturer’s official website or user forums for more tips and tricks. The user manual of your Deebot is also a treasure trove of information. Don’t hesitate to reach out to customer service for any queries or concerns.
Remember, taking good care of your Deebot means you’re also taking good care of your home. Keep up the great work!
How Do You Fix A Side Brush Malfunction On A Deebot
To fix a side brush malfunction on a Deebot, follow these steps:
- Power off the Deebot: Before attempting any repairs, ensure that your Deebot is powered off and unplugged to avoid any accidents or damage to the device.
- Inspect the side brush: Check for any visible signs of damage, such as tangled hair, debris, or broken bristles. If you find any, remove the side brush from the Deebot and clean it thoroughly, removing any debris or tangled hair.
- Check the motor: In some cases, the side brush motor may be the issue. If you suspect a motor malfunction, you may need to remove the entire side brush assembly and inspect the motor for any visible damage or debris. Clean the motor and its components if necessary, and make sure the bristles are not entangled in hair or debris.
- Reassemble the side brush: Once you have cleaned and inspected the side brush and its components, reassemble the side brush assembly, ensuring that all parts are properly aligned and secured.
- Test the side brush: After reassembling the side brush, reinstall it into the Deebot and turn the device on. If the side brush is functioning properly, it should spin freely and not cause any issues during operation.
If the side brush malfunction persists after following these steps, it’s recommended to consult the user manual or contact the manufacturer’s support for further assistance. Additionally, you can refer to instructional videos, such as the ones found on YouTube, for more detailed guidance on fixing side brush issues.
Conclusion
So, there you have it! Now you know exactly how to fix Deebot main brush malfunction. With these steps, you’re well-equipped to tackle any main brush malfunction your Deebot might throw at you.
Remember, regular maintenance can prevent many of these issues from happening in the first place.
If all else fails and you’re still facing problems, don’t hesitate to seek professional help. It’s better to have a functioning Deebot than to risk further damage.
Happy cleaning!
FAQs
What is the average lifespan of a Deebot main brush?
Your Deebot main brush’s lifespan typically ranges from 6 to 12 months. However, it largely depends on your usage and maintenance. Regular cleaning and replacing can significantly extend its life.
Are there specific signs indicating the need to replace the main brush, other than malfunctioning?
Yes, there are signs other than malfunctioning that indicate a need to replace your Deebot’s main brush. These include excessive noise during operation, reduced cleaning efficiency, and visible wear and tear on the brush.
Can the use of non-branded or cheaper brushes affect the Deebot’s performance?
Yes, using non-branded or cheaper brushes can indeed affect your Deebot’s performance. These brushes may not fit properly, causing the robot to work harder and potentially damaging your machine over time.
How often should I clean the main brush to ensure optimal functionality?
To ensure optimal functionality of your Deebot, it’s best to clean the main brush after every use. However, a thorough cleaning should be done at least once a week to maintain its performance.
Does the warranty of the Deebot cover the main brush replacement?
Yes, your Deebot’s warranty typically covers main brush replacement. However, it’s important to check the exact terms of your warranty as coverage can vary. Always contact customer service for any warranty-related questions.
Where is the DEEBOT laser distance sensor?
The DEEBOT laser distance sensor is located on the top of the robot, and it is responsible for mapping and navigating the cleaning area.
Why does my DEEBOT keep stopping and blinking red?
If your DEEBOT keeps stopping and blinking red, it could indicate a low battery, a problem with the robot, or a dirty sensor. Check the battery level, clean the sensors, and ensure that the robot is not blocked by obstacles or stuck in a tight space.