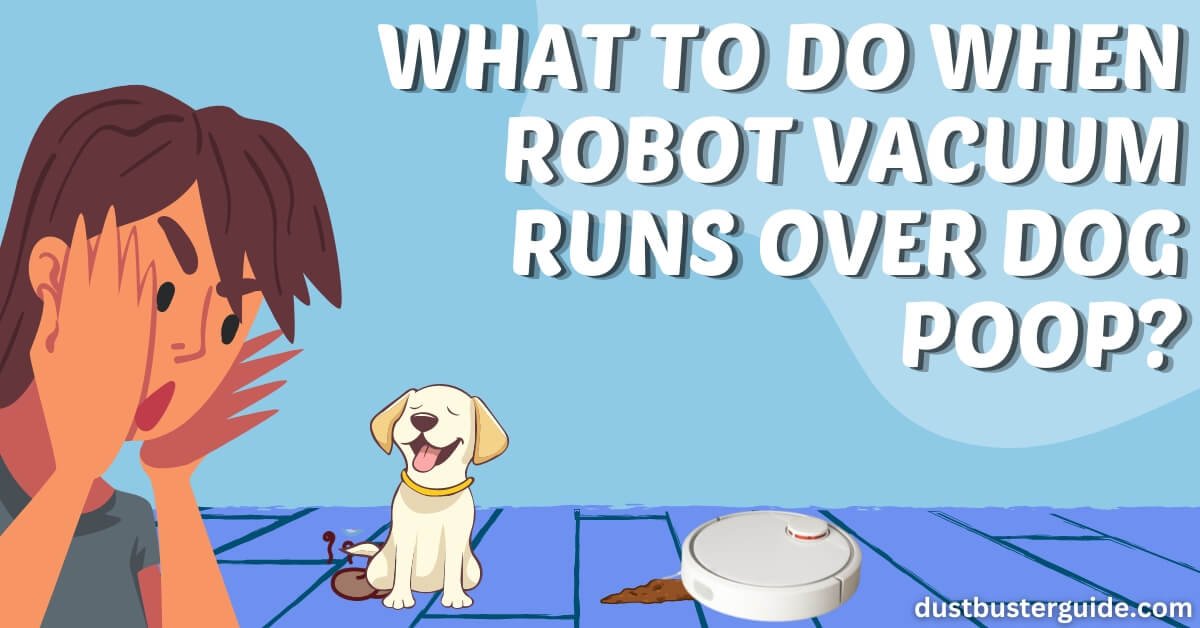
Ever faced the comical yet concerning scenario of your robot vacuum encountering a less-than-tidy surprise, leading to the question, what to do when robot vacuum runs over dog poop? If you’ve ever found yourself in this messy situation, you’re not alone in navigating the pitfalls of automated cleaning.
Picture this: your diligent cleaning companion encountering an unexpected obstacle. In just a couple of lines, the answer tiptoes in: pause the robot, clean the wheels and brushes, and ensure thorough sanitization to handle the unforeseen mess.
But before you assume it’s a comedic blip in your cleaning routine, join us on this exploration. We’ll guide you through the steps, ensuring your robot vacuum gracefully recovers from the unexpected dance with doggy deposits!
What To Do When Robot Vacuum Runs Over Dog Poop: Stepwise
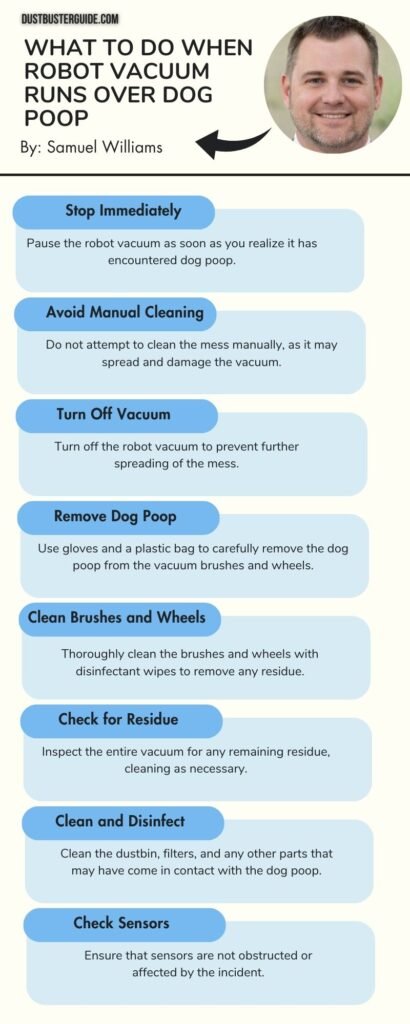
If your robot vacuum runs over dog poop, you’re going to have to stop it immediately to prevent any further mess and damage to your floors.
- First, turn off the vacuum and carefully remove any visible poop from the brushes or wheels using gloves or a paper towel. Be sure to dispose of the waste properly.
- Next, clean the affected area thoroughly by using a pet-safe cleaner and a cloth or mop. It’s important to disinfect the area to eliminate any bacteria or odor.
Once the area is clean, you can resume using your robot vacuum. Below we have a complete guide on you should clean your robot vacuum that runs over a dog’s poop.
Things You Need Before Cleaning
Before you start cleaning, make sure you have all the necessary supplies ready.
- First, you’ll need to have the robot vacuum itself charged and ready to go. This means ensuring that it’s plugged in and has enough battery life to clean the entire room.
- Next, you’ll need to have the cleaning solution or water and detergent ready if you plan on mopping the floors with the robot vacuum.
- Additionally, make sure you have any necessary attachments or brushes for specific cleaning tasks, such as a pet hair brush if you have pets.
- It’s also important to have a clean filter and dustbin to ensure optimal cleaning performance.
By having all these supplies prepared, you can ensure a smooth and efficient cleaning process with your robot vacuum.
How To Clean Robot Vacuum That Runs Over Dog Poop
Let’s find out how to clean a robot vacuum that runs over dog poop. Below is the step-by-step guide.
Remove The Battery
To remove the battery, you’ll just need to slide it out gently. First, make sure the robot vacuum is turned off and unplugged from the power source.
Locate the battery compartment, which is usually located on the back or bottom of the vacuum. Depending on the model, you may need to use a screwdriver to remove any screws securing the compartment.
Once the compartment is open, locate the battery and carefully slide it out. Be cautious not to force it or damage any wires connected to it. If the battery is secured with a latch or clip, release it before sliding out the battery.
Once the battery is removed, it can be cleaned separately using a mild detergent and water solution. Allow the battery to dry completely before reinserting it back into the robot vacuum.
Ensure that the battery is properly aligned and securely inserted before closing the compartment. Finally, reattach any screws if necessary and test the vacuum to ensure it is functioning properly.
Replace Brushes
Once you’ve got the hang of it, replacing the brushes on your robot vacuum is a breeze! All you need to do is follow a few simple steps.
First, make sure your robot vacuum is turned off and unplugged. Then, locate the brush compartment on the underside of the vacuum. Open the compartment and remove the old brushes by gently pulling them out.
Take the new brushes and insert them into the slots, making sure they’re securely in place. Close the brush compartment and you’re done! It’s as easy as that.
Replacing the brushes on your robot vacuum is a quick and straightforward process that’ll keep your vacuum running efficiently and effectively.
Remove Brush Assembly
Removing the brush assembly is a simple task that will ensure the optimal performance of your robot vacuum. To begin, we first need to locate the brush assembly, which is usually located underneath the robot vacuum. Once located, we can proceed to remove it by gently pulling it out from its housing.
It’s important to be cautious and gentle while removing the brush assembly to avoid any damage. Once removed, we can inspect the brush for any debris or tangled hair that may have accumulated. If there’s any debris present, we can clean it off using a brush or by using our hands.
After cleaning, we can then reassemble the brush assembly by inserting it back into its housing and ensuring that it’s securely in place.
By regularly removing and cleaning the brush assembly, we can ensure that our robot vacuum continues to function efficiently and effectively in cleaning our rooms.
Clean Brush Assembly Connector
After successfully removing the brush assembly, we now move on to the next step. This step involves cleaning the brush assembly connector. The connector plays a crucial role in the functioning of the robot vacuum. It ensures a proper connection between the brush assembly and the main unit. Over time, dirt, hair, and debris can accumulate in this area.
This accumulation hinders the efficiency of the vacuum. To rectify this, we need to carefully clean the brush assembly connector using a soft cloth or a small brush. By doing so, we can ensure that the brush assembly connects seamlessly. This seamless connection allows the robot vacuum to effectively clean the room.
Remove The Wheels
To move forward in the cleaning process, simply detach the wheels from their positions. This can be done by locating the small release buttons on each wheel and pressing them simultaneously. Once the buttons are pressed, gently pull the wheels away from the robot vacuum until they’re completely detached.
It’s important to handle the wheels with care to avoid any damage. Once the wheels are removed, you can proceed with the next steps in the cleaning process.
Remove The Front Bumper
Once you’ve detached the wheels, the next step is to easily remove the front bumper of your robot vacuum. This can be done by locating the screws or clips that hold the bumper in place and unscrewing or releasing them.
It’s important to be gentle and careful while removing the front bumper to avoid any damage. Once the screws or clips are removed, the bumper can be gently pulled off, revealing the inner components of the robot vacuum.
Removing the front bumper allows for easy access to the brushroll, filters, and other parts that may need cleaning or maintenance. It’s recommended to clean the front bumper and its surrounding area regularly to ensure optimal performance of your robot vacuum.
Clean Under The Front Bumper
You can easily clean under the front bumper by using a soft cloth or brush to remove any dirt or debris that may have accumulated. This is a simple and effective way to ensure that your robot vacuum is able to properly clean the room.
By regularly cleaning under the front bumper, you can prevent any blockages or malfunctions that may occur. It’s important to keep this area clean to maintain the efficiency and performance of your robot vacuum.
Additionally, by regularly cleaning under the front bumper, you can prolong the lifespan of your robot vacuum and ensure that it continues to work effectively for a long time. So, make it a habit to clean under the front bumper regularly and enjoy a clean and tidy room.
Remove Top Plastic
Before we move on to the current subtopic, let’s quickly recap what we discussed in the previous subtopic. We learned about the importance of cleaning under the front bumper of a robot vacuum to ensure optimal performance and efficiency.
Now, let’s shift our focus to the current subtopic: removing the top plastic. When it comes to cleaning a room, it’s essential to remove the top plastic of a robot vacuum to access its inner components and ensure thorough maintenance.
By detaching the top plastic, we can easily clean the dustbin, remove any debris stuck in the brushes, and clean the filters. This process allows us to maintain the robot vacuum’s cleaning efficiency and prolong its lifespan.
So, let’s dive into the details of how to remove the top plastic and maximize the cleaning capabilities of our robot vacuum.
Unscrew Top Shell
To access the inner components and ensure thorough maintenance, simply unscrew the top shell of our robot vacuum. This step is essential for cleaning or replacing any parts that may need attention.
By removing the top shell, we can easily access the brushes, filters, and other components that are responsible for the vacuum’s cleaning power.
It’s important to note that before unscrewing the top shell, we should make sure to turn off and unplug the vacuum to prevent any accidents or damage.
Once the shell is removed, we can carefully clean or replace the necessary parts, ensuring that our robot vacuum continues to function optimally and keeps our rooms clean.
Check Roomba Circuit Board
After successfully unscrewing the top shell of the robot vacuum, we can now move on to the next step – checking the Roomba circuit board.
This is a crucial component that controls the various functions of the vacuum, ensuring it operates efficiently. By examining the circuit board, we can identify any potential issues or malfunctions that may be hindering the cleaning process.
It’s recommended to inspect the circuit board for any visible signs of damage, such as burnt components or loose connections. Additionally, it’s important to check for any dirt or debris that may have accumulated on the circuit board, as this can disrupt the proper functioning of the vacuum.
Taking the time to carefully examine and clean the Roomba circuit board will help ensure optimal performance and efficiency when it comes to cleaning your room.
Can You Wash The Inside Of A Vacuum?
Although it’s possible to clean the outside of a vacuum easily, you can’t wash the inside. The inside of a vacuum contains delicate electronic components and mechanisms that can be damaged by water or cleaning solutions.
It’s important to keep the inside of a vacuum dry and avoid introducing any moisture that could cause malfunctions or electrical hazards. Instead of washing the inside, it’s recommended to focus on regular maintenance tasks such as emptying the dust bin, cleaning the filters, and removing any tangled hair or debris from the brush roll.
By keeping the outside and maintenance tasks in check, you can ensure that your vacuum performs optimally and efficiently for each cleaning session.
Does Roomba Have Poop Detection?
We just discussed whether it’s possible to wash the inside of a vacuum, and now let’s move on to a fascinating feature of the Roomba robot vacuum – poop detection.
Yes, you heard it right! Roomba actually has poop detection capabilities. This means that if your pet has an accident on the floor, the Roomba can detect it and avoid spreading the mess around your house.
It uses a combination of sensors and algorithms to identify and avoid such unpleasant surprises. This feature is a game-changer for pet owners, as it provides an extra layer of convenience and cleanliness.
With Roomba’s poop detection, you can have peace of mind knowing that your floors will remain clean even in unexpected situations.
You can also learn why your vacuum smells like vomit and how you can fix it. Click here to find out.
How To Prevent Robot Vacuum From Running Over Dog Poop
To prevent your furry friend’s little accidents from becoming a messy disaster, here are some simple steps you can take:
- First, establish a designated area for your pet to relieve themselves. This could be a specific spot in your backyard or a pee pad indoors. By training your pet to use this designated area, you can minimize the chances of them having an accident in a room where the robot vacuum operates.
- Second, keep a close eye on your pet and monitor their bathroom habits. By knowing when they need to go, you can quickly remove them from the room before any accidents occur.
- Third, consider using baby gates or barriers to restrict your pet’s access to certain areas while the robot vacuum is cleaning. This will ensure that they are kept away from any potential mess.
- Fourth, try to establish a regular cleaning routine for your robot vacuum. By running it at scheduled times, you can reduce the chances of it encountering any accidents left behind by your pet.
- Lastly, always do a quick visual check of the room before starting the robot vacuum. This will allow you to spot any potential accidents and clean them up manually before the vacuum begins its cleaning cycle.
By following these steps, you can enjoy a clean home while keeping your furry friend’s accidents under control.
Is Roomba J7+ The Best Choice For Pet Owners

If you’re a pet owner looking for the ultimate cleaning solution, the Roomba J7+ is the best choice for you. This advanced robot vacuum is specifically designed to handle the challenges that come with having pets in your home.
With its powerful suction and dual multi-surface rubber brushes, it can effectively pick up pet hair, dander, and other debris. But what sets the Roomba J7+ apart is its intelligent pet detection technology. It uses a state-of-the-art camera and sensors to identify and avoid common pet messes, such as dog poop.
This means you don’t have to worry about your robot vacuum running over a surprise accident and spreading it around your house. The Roomba J7+ will simply navigate around it and continue cleaning.
Additionally, this robot vacuum is equipped with a Clean Base Automatic Dirt Disposal, which allows it to empty its own bin, making it even more convenient for pet owners.
So if you want a hassle-free cleaning experience and a robot vacuum that can handle pet messes with ease, the Roomba J7+ is the perfect choice for you.
Conclusion
So now you know what to do when robot vacuum runs over dog poop. Handling a robot vacuum running over dog poop can be messy, but there are effective steps to deal with the situation. Prepare essential items like gloves, paper towels, and cleaning solutions for quick cleanup.
Follow the provided instructions to properly clean the vacuum, and disinfect it for future use. Be cautious not to damage internal components by washing the inside. Prevent such incidents by using virtual walls and keeping the area clear of obstacles.
FAQs
What should I do if my robot vacuum runs over dog poop?
If our robot vacuum runs over dog poop, we should immediately stop it and clean the mess. It’s important to prevent any further spread of the mess and ensure that the vacuum is not damaged.
What are the essential things I need before cleaning with a robot vacuum?
Before cleaning with a robot vacuum, we need to make sure the floor is clear of any small objects or items that could get stuck in the vacuum. It’s also important to remove any loose cords or cables that could be a hazard.
How can I clean a robot vacuum that has run over dog poop?
To clean a robot vacuum that has run over dog poop, we should first turn it off and unplug it. Then, carefully remove the dirt container and clean it with warm soapy water. Lastly, wipe down the vacuum and let it dry before using it again.
Is it possible to wash the inside of a vacuum?
Yes, it is possible to wash the inside of a vacuum. It is important to refer to the user manual for specific instructions on how to clean the inside of your vacuum properly.
Does the Roomba have poop detection technology?
The Roomba does not have poop detection technology. However, it is designed to handle small messes and can effectively clean a room.
Any tips for cleaning dog poop out of Shark IQ?
For cleaning dog poop out of a Shark IQ or any robot vacuum, follow these steps: turn off the vacuum, use gloves, remove the dirt bin, clean any visible waste, use a damp cloth for further cleaning, and allow it to dry before reassembly.
Roomba ran over dog shit. Clean or throw away?
If a Roomba runs over dog feces, clean it immediately to prevent damage. Remove the dirt bin, and clean the brushes, wheels, and any affected parts. Use disinfectant wipes for thorough cleaning. Avoid using water directly on the vacuum, and allow it to dry before use. If the contamination is severe, consider contacting the manufacturer for guidance.
External Resources
- The Best Robot Vacuum You Can Buy Right Now – The Verge
- The Design Methodology To Develop New-Generation Universal-Motors For Vacuum Cleaners – IEEE Xplore
- The Effect Of Vacuum Cleaners On The Concentration And Particle Size Distribution Of Airborne Cat Allergen – The Journal of Allergy and Clinical Immunology
- Suck Up The Mess: The Benefits Of Using A Car Vacuum Cleaner – 91Wheels