
The wheel woe prompts a question of robotic mobility: how to fix Deebot wheel? It’s an exploration into troubleshooting for seamless Deebot navigation.
Picture this: your Deebot experiencing a wheel hiccup, and the question arises. In just a couple of lines, the answer rolls in like a wheel-fixing revelation: Examine the wheel for debris or blockages, ensure it’s properly seated, and if needed, clean or replace the wheel.
Regular maintenance ensures your Deebot glides smoothly across floors. Join us on this exploration for a step-by-step guide to addressing Deebot wheel issues.
What Is The Problem With Your Deebot Wheel?
Before you jump into fixing your Deebot wheel, it’s crucial to understand what’s going wrong with it in the first place.
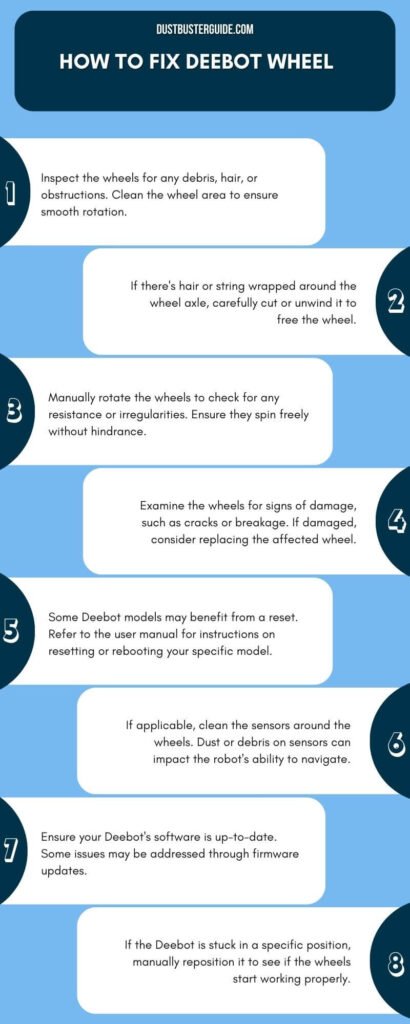
Just like any other part of your Deebot vacuum cleaner, the wheel can encounter several issues that can affect its performance. Common problems include wheels being stuck or jammed, not rotating properly, or even falling off completely. You might also notice a significant decrease in your Deebot’s speed or agility. This could be due to debris stuck in the wheel or the wheel’s axle, or it could be a sign of a more serious mechanical issue.
To figure out what’s wrong with your Deebot wheel, you’ll need to do a little troubleshooting. Start by turning off the vacuum and unplugging it from the charger. Next, carefully turn it over and examine the wheels. Check for any visible signs of damage, like cracks or chips. Also, try spinning the wheels by hand to see if they move freely, or if there’s any resistance.
If you notice anything unusual, like a wheel not spinning at all or spinning with difficulty, it could be a sign of a jam or another mechanical problem that requires further attention.
How To Fix Deebot Wheel – 5 Steps
In this section, we are going to provide you with the step-by-step process of how to fix Deebot wheels. So let’s move on:
- Gather the required tools and spare parts
- Remove the faulty wheel
- Inspect and clean the wheel
- Replace or repair the wheel
- Reassemble your Deebot
1. Gather The Required Tools And Spare Parts
Gathering all necessary tools and spare parts is your first step in this process. It’s crucial to have everything you need before you start, to avoid any unnecessary delays or complications.
Generally, you’ll require a screwdriver to detach the wheel and possibly some tweezers to remove any debris or hair that might be causing the problem. Always refer to the user manual or manufacturer’s guide for specifics, as the tools needed may vary depending on the particular Deebot model you own.
In terms of spare parts, you might need a replacement wheel if your current one is damaged beyond repair. You can usually buy these from the manufacturer directly or from an authorized dealer. Make sure to get the correct wheel for your Deebot model to ensure a perfect fit and smooth operation.
Having a clean workspace can also aid in keeping track of all the parts and tools, making the whole process much more manageable.
2. Remove The Faulty Wheel
Now let’s dive into the next crucial part of the repair process – removing the faulty wheel of your Deebot.
First, you’ll need to know how to safely turn off your Deebot to avoid any mishaps.
After that, we’ll guide you through the steps to carefully remove the defective wheel from your device.
How To Safely Turn Off Your Deebot
You might be wondering how to safely turn off your Deebot without causing any damage, right? Well, it’s quite simple and straightforward.
First, you need to locate the power switch which is typically found on the side or bottom of the device. Then, slide it to the off position. You’ll know it’s off when the device’s lights are no longer illuminated.
Additionally, it’s a good idea to unplug the machine from its charging dock to prevent any electrical issues while you’re working on it.
In case your Deebot doesn’t have an external power switch, don’t fret. You can simply press and hold the auto button on your Deebot for about three to five seconds. This will cause the device to shut down.
Remember, safety should always be your first priority when working on any electrical device. By properly powering down your Deebot, you’re taking the first step in a safe wheel repair process.
Steps To Remove The Wheel
Once your Deebot is safely powered down, it’s time to focus on the actual removal of the wheel. This is a relatively simple process, but it needs to be done carefully to avoid damaging any part of your robotic vacuum.
Start by flipping your Deebot upside down so that the wheels are easily accessible. The wheels are usually found at the base of the unit, and they’re typically held in place by a few screws. Using a screwdriver, gently unscrew these screws and put them in a safe place so you don’t lose them.
After you’ve removed the screws, gently pull the wheel out of its slot. It should come out relatively easily, but if you’re having trouble, avoid using excessive force as this could damage the wheel or the slot. Instead, try wiggling the wheel gently to loosen it.
If the wheel still doesn’t come out, it might be clogged with debris. In that case, use a soft brush or cloth to clean around the wheel and try again. Remember to keep track of all the parts you remove and where they came from, to make reassembly easier later on.
3. Inspect And Clean The Wheel
Before diving into the repair process, it’s crucial to give your Deebot wheel a thorough inspection and cleaning.
Start by checking if there are any visible signs of damage or wear on the wheel. Look for cracks, tears, or any other form of physical damage. If the wheel is in a worn-out state, replacing it might be a better option than fixing it.
Additionally, check if the wheel is wobbling or not rotating smoothly, as these could be symptoms of a faulty wheel bearing.
In addition to the visual inspection, make sure to clean the wheel thoroughly. Dust, debris, and hair often get trapped in the wheel, causing it to malfunction over time. You can use a soft brush or a damp cloth to clean the wheel. Be careful not to wet any electrical parts, though, as water can cause additional damage.
After cleaning, give the wheel a spin to see if it’s moving freely. If it’s still not rotating smoothly, it’s time to dive into the repair process.
4. Replace Or Repair The Wheel
Now let’s delve into the next crucial aspect of maintaining your Deebot – knowing when to repair or replace the wheel, and understanding the steps involved in the process.
It’s essential to discern when a simple repair can fix the issue or when it’s time to completely replace the wheel.
So, let’s break down the decision-making process and walk you through the steps for both wheel replacement and repair.
When To Repair Vs. Replace
Understanding when to repair or replace your Deebot’s wheel can save you both time and money, not to mention the hassle of dealing with a malfunctioning cleaning assistant.
Generally, if the wheel is jammed due to collected dust or debris, a simple cleaning or repair can solve the problem. However, if the wheel is severely damaged, or worn out, or the robot shows persistent issues even after cleaning, it may be time to consider a replacement.
When deciding whether to repair or replace, consider the overall condition of your Deebot. If it’s relatively new and the rest of the parts are in good condition, a repair might suffice. On the other hand, if your Deebot is older and showing signs of wear and tear, replacing the wheel might be a smarter choice.
Remember, a properly functioning wheel is integral to the performance of your Deebot, so don’t delay addressing any issues you observe.
| Consideration | Condition |
| Repair | The wheel is severely damaged, or worn out, or the robot has persistent issues. |
| Replacement | Wheel is severely damaged, or worn out, or the robot has persistent issues. |
Steps For Wheel Replacement Or Repair
Let’s dive into the process of repairing or replacing your robotic vacuum cleaner’s wheel, making sure it’s back to its best and ready to tackle any mess.
The first thing you’ll need to do is gather the right tools. Usually, a small Phillips screwdriver and a flathead screwdriver will suffice. With these in hand, you’ll want to start by turning off your Deebot and removing it from its charging station.
Flip it over and locate the wheel that’s causing problems. If it’s visibly damaged, such as having a crack or being warped, you’ll likely need to replace it. However, if it’s just not spinning properly, you may be able to fix it with a good cleaning.
After identifying the issue, the next step is to either clean or replace the wheel. For cleaning, use a cloth or a small brush to get rid of any dust or debris that may be hindering the wheel’s movement. If that doesn’t do the trick, it’s time for a replacement.
To replace the wheel, use your screwdriver to remove the screws holding it in place. Once the wheel is removed, simply replace it with a new one and secure it with the screws. Remember, always refer to your Deebot’s user manual for any specific instructions or precautions.
And there you have it! With these simple steps, you should be able to restore your robotic vacuum’s mobility, ensuring it’s ready for its next cleaning mission.
5. Reassemble Your Deebot
Once you’ve successfully detached and cleaned the wheel of your Deebot, the next step is to reassemble it, making sure it’s ready to whizz around your home once more.
Start by inserting the wheel back into its slot, ensuring it fits snugly and securely. If you’ve replaced the wheel with a new one, make sure the replacement wheel is of the correct size and type for your Deebot model.
Once the wheel is in place, secure it using the screws you removed earlier. Don’t forget to tighten the screws firmly but be careful not to over-tighten as it could damage the wheel or the robot.
The final step is to replace the robot’s cover and secure it with the screws. Again, make sure to tighten these screws securely, but avoid over-tightening.
Once everything is back in place, turn on your Deebot and let it run for a few minutes to test the wheel. If it moves smoothly and doesn’t make any unusual noises, you’ve successfully reassembled your Deebot! If not, you may need to revisit your steps and make sure everything has been done correctly.
It’s always important to ensure your Deebot is running smoothly to keep your home clean and dust-free.
Preventive Measures For Future

To ensure your robotic vacuum’s longevity, it’s crucial to adopt preventive measures for future maintenance. Regularly inspecting your Deebot’s wheels can prevent any future issues and ensure optimal performance.
- Be in the habit of removing any hair, dust, or debris stuck in the wheels that could potentially impair their function. Also, make sure to keep your floors clean and free from small objects that can get lodged in the wheels.
- Another effective measure is to handle your Deebot with care. Avoid dropping or hitting it, as this could damage the wheels or other components. Don’t use your Deebot on wet floors or surfaces with a steep slope, as this might cause wheel slippage or damage.
- If you notice any issues with the wheels or other parts, address them immediately to prevent further damage. Remember, a little preventive care goes a long way in maintaining the efficiency and lifespan of your Deebot.
How Often Should I Clean And Replace My Deebot Wheels
When it comes to cleaning and replacing the wheels on your Deebot, the frequency will depend on usage and the condition of the wheels.
As a general guideline, it’s a good practice to inspect the wheels regularly for any debris, hair, or damage that may affect their performance. If you notice the wheels are jammed or have difficulty moving, it may be necessary to clean or replace them.
Additionally, if you use your Deebot frequently in areas with a lot of debris or pet hair, you may need to clean or replace the wheels more often. However, if the wheels are in good condition and the Deebot is operating effectively, regular cleaning and maintenance should suffice to keep the wheels in optimal condition.
Conclusion
So you’ve taken the bull by the horns and have known exactly how to fix Deebot wheel yourself. That’s no small feat! You’ve saved yourself quite a bit of money and gained some new skills in the process.
As you continue to maintain your Deebot, remember these steps you’ve taken and the importance of regular checks and cleanings.
Going forward, make sure to take preventive measures to avoid such issues in the future. Your Deebot is an investment, and it’s up to you to keep it in top-notch condition.
You’ve got this!
FAQs
What are some common signs of a malfunctioning Deebot wheel?
Common signs of a malfunctioning Deebot wheel include difficulty navigating, inability to move in a straight line, and making unusual noises. You might also notice excessive wobbling or the robot getting stuck frequently.
Can I use alternative tools if I don’t have the specific tools mentioned in the article?
Yes, you can use alternative tools in a pinch. However, be mindful that using the right tools is crucial for a proper fix. Improvising might work temporarily, but it risks causing more damage long term.
How often should I inspect and clean the Deebot wheel for optimal performance?
You should inspect and clean your Deebot wheel every two to four weeks for optimal performance. Regular maintenance can prevent debris buildup and ensure the wheels move smoothly, enhancing your robot vacuum’s efficiency.
Is it possible to repair the wheel myself, or should I send it to a professional?
Yes, it’s possible to fix the Deebot wheel yourself. However, if you’re not comfortable with DIY repairs, it’s best to send it to a professional to avoid causing further damage to your device.
What are some effective preventive measures to avoid future wheel issues in Deebot?
To avoid future wheel issues with your Deebot, regularly clean the wheels, remove debris from its path, and avoid driving it over thick carpets or cables. Regular maintenance can significantly prolong its lifespan.
Why is the right wheel not working on my Deebot?
If the right wheel is not working on your Deebot, it could be due to a blockage or dirt in the wheel. Try cleaning the driving wheels by turning the robot over and pressing and rotating the wheels to remove any entangling debris.
How do you clean driving wheels on a Deebot?
To clean the driving wheels on a Deebot, turn the robot over and press and rotate the wheels to remove any entangling debris. Use a semi-dry mop to wipe the surfaces of the wheels.
External Resources
- Design And Development Of Automatic Cleaning And Mopping Robot – Institute of Physics
- Comparing The Recommendations Of Buyers Of Energy-Efficient And Inefficient Vacuum Cleaners – MDPI
- The Best Robot Vacuum You Can Buy Right Now – The Verge
- The Design Methodology To Develop New-Generation Universal-Motors For Vacuum Cleaners – IEEE Xplore