
The DIY dance of creation sparks a curiosity: how to make a robot vacuum? It’s a journey into the world of crafting your cleaning companion, turning everyday items into a robotic marvel.
Picture this: your diligent DIY workshop is ready for experimentation, and the question arises. In just a couple of lines, the answer materializes like a DIY revelation: Combine a chassis, motors, sensors, and a vacuum mechanism to create a rudimentary robot vacuum.
But before you assume it’s a simple assembly, join us on this creative exploration. We’ll guide you through the essential components and steps, ensuring your homemade robot vacuum sweeps through your DIY realm.
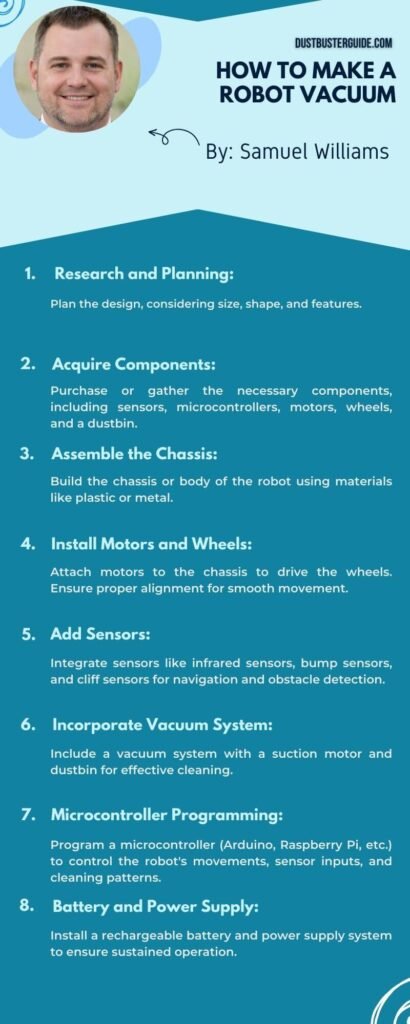
How To Make A Robot Vacuum: Step-By-Step
Are you tired of spending hours vacuuming your floors every week? Imagine if you could have a robot do all the work for you while you sit back and relax. With some basic materials and a little bit of programming, you’ll have your own automated cleaning assistant in no time. To make a robot vacuum, you will need to follow these steps:
Gather The Necessary Materials
Before you begin building your robot vacuum, make sure you have all the materials you need. Here’s a list of what you’ll require:
- Robot chassis: This will serve as the body of your robot. You can find pre-made robot chassis online or create your own using materials like wood or plastic.
- Motors and wheels: You’ll need two motors and wheels to give your robot the ability to move around. Make sure the motors are compatible with your chosen robot chassis.
- Vacuum cleaner motor: This will be the main component responsible for sucking up dirt and debris. You can salvage a motor from an old vacuum cleaner or purchase a new one.
- Battery pack: Your robot vacuum will need a power source. A rechargeable battery pack is a good option as it can provide extended operating time.
- Arduino board: The Arduino board will act as the brain of your robot. It is a microcontroller that you can program to control various aspects of your robot’s behavior.
- Sensors: To make your robot vacuum smart and capable of avoiding obstacles, you’ll need sensors such as ultrasonic sensors, infrared sensors, or proximity sensors.
Other tools and accessories: Don’t forget to gather tools like screwdrivers, wires, and connectors to assemble your robot. Additionally, you may want to consider adding a dustbin to collect the dirt and debris.
Plan And Design Your Robot
Before you start assembling your robot, it’s important to have a clear plan and design in mind. Here are a few things to consider:
- Size and shape: Determine the size and shape of your robot based on your chosen robot chassis and the available space in your home.
- Sensor placement: Decide where to place your sensors to ensure your robot can detect obstacles and navigate around them.
- Vacuum motor placement: Position the vacuum motor in a way that allows it to effectively suck up dirt and debris from the floor.
Assemble The Components
Now that you have your materials and a plan in place, it’s time to assemble your robot. Follow these steps:
- Attach the motors and wheels to the robot chassis using screws or brackets. Make sure they are securely fastened.
- Connect the vacuum cleaner motor to the robot chassis. You may need to create a mounting bracket to hold the motor in place.
- Mount the Arduino board on the robot chassis. Connect the motors and sensors to the appropriate pins on the Arduino board.
- Connect the battery pack to the Arduino board to provide power to your robot.
Program Your Robot
Once your robot is assembled, you’ll need to program it to clean your floors. Here are the basic steps:
Install the Arduino software on your computer.
- Write the code to control your robot’s movements, sensor readings, and vacuum motor functionality. You can find sample code online or create your own based on your specific requirements.
- Upload the code to the Arduino board using a USB cable.
- Test the robot’s movements and sensor readings to ensure everything is working correctly. Make adjustments to the code if necessary.
Test And Fine-Tune
After programming your robot, it’s time to test it out and make any necessary adjustments. Here’s what you should do:
- Place your robot on the floor and let it navigate around the room. Observe how it responds to obstacles and if it effectively cleans the floor.
- If you encounter any issues, review the code and make necessary changes to improve your robot’s performance.
- Continue testing and fine-tuning until you are satisfied with the results.
Now you have your very own robot vacuum! Sit back, relax, and let your new cleaning assistant do all the work for you. With regular maintenance and cleaning, your DIY robot vacuum will keep your floors spotless.
In conclusion, making a robot vacuum is an exciting project that anyone can undertake. By following these steps and using simple language, you can create your own automated cleaning assistant. Enjoy the convenience of a clean home without the hassle of manual vacuuming!
How To Test And Troubleshoot The Robot Vacuum Effectively
Test and troubleshoot your robot vacuum to ensure it’s working efficiently and effectively. Once you’ve programmed your robot vacuum and set it loose in your home, it’s important to test its performance and address any issues that may arise.
Here are some steps you can take to test and troubleshoot your robot vacuum:
- Observe its cleaning pattern: Watch how your robot vacuum moves around your home and make sure it covers all areas. It should navigate smoothly without getting stuck or missing spots. If you notice any irregularities, such as the robot vacuum repeatedly going over the same area or avoiding certain areas altogether, it may require adjustments.
- Check for debris accumulation: Regularly inspect the robot vacuum’s brushes, wheels, and sensors for any accumulated debris. Over time, hair, dust, and other particles can get tangled in the brushes or hinder the sensors’ performance. Clean these components regularly to maintain optimal performance.
- Test its sensors: Your robot vacuum relies on various sensors to navigate your home and avoid obstacles. Test these sensors by placing objects in their path, such as small toys or furniture. Make sure the robot vacuum detects these obstacles and adjusts its path accordingly. If it consistently fails to detect obstacles or frequently bumps into objects, you may need to clean or recalibrate the sensors.
- Address error messages: If your robot vacuum displays error messages, refer to the user manual to understand the issue and how to resolve it. Common error messages may indicate problems with the dustbin, brushes, or battery. Follow the instructions provided to troubleshoot and fix the problem.
- Evaluate its battery life: Pay attention to how long your robot vacuum operates on a single charge. If it consistently runs out of battery before completing its cleaning cycle, you may need to replace the battery or adjust the programming to focus on high-traffic areas first.
Testing and troubleshooting your robot vacuum is essential to ensure it effectively cleans your home. By following these steps, you can identify any issues and address them promptly, allowing your robot vacuum to perform optimally and make your cleaning routine more efficient.
| Steps | Description |
| Observe Cleaning Pattern | Inspect and clean brushes, wheels, and sensors. |
| Check for Debris | Refer to the manual, troubleshoot as instructed. |
| Test Sensors | Verify obstacle detection, clean or recalibrate. |
| Address Error Messages | Monitor performance, and consider adjustments. |
| Evaluate Battery Life | Monitor performance, and consider adjustments. |
How To Enhance The Robot Vacuum Performance

To enhance your robot vacuum’s performance, consider implementing additional features or accessories that can improve its cleaning capabilities. There are several options available in the market that can elevate the functionality of your robot vacuum and make it even more efficient in keeping your floors clean.
Here are a few suggestions to enhance your robot vacuum:
- Virtual Wall Barrier: If you want to restrict your robot vacuum from entering certain areas or rooms, a virtual wall barrier is a great addition. It uses infrared or magnetic signals to create an invisible barrier that the robot vacuum cannot cross. This is particularly useful for keeping the robot vacuum away from delicate objects or areas with cords.
- Mopping Attachment: Some robot vacuums come with a mopping attachment that can be easily attached and detached. This additional feature allows the robot vacuum to not only vacuum your floors but also mop them simultaneously. It can be a great option for maintaining hard floors and keeping them shiny and spotless.
- Self-Emptying Station: One of the downsides of robot vacuums is that they tend to have limited dustbin capacities, requiring frequent emptying. However, with a self-emptying station, you can avoid this hassle. These stations automatically empty the robot vacuum’s dustbin into a larger container, saving you time and effort.
- Wi-Fi Connectivity and App Control: Many modern robot vacuums offer Wi-Fi connectivity and can be controlled through a smartphone app. This feature allows you to schedule cleaning sessions, monitor the robot vacuum’s progress, and even control it remotely. It adds convenience and flexibility to your cleaning routine.
By considering these enhancements, you can take your robot vacuum’s cleaning capabilities to the next level. Each additional feature or accessory brings added convenience and efficiency, making your cleaning tasks easier and more effective.
How Do The Essential Accessories Enhance The Robot Vacuum Cleaning Performance
Enhancing your DIY robot vacuum with additional features and accessories can transform your cleaning experience into a delightful and efficient task. After building your own robot vacuum, you have the freedom to customize and add components that suit your specific needs.
Here are some ways to make the most out of your DIY robot vacuum:
Remote Control: Consider adding a remote control feature to your robot vacuum. This allows you to easily control the movements and cleaning schedule of your vacuum from a distance. You can start, stop, or change the direction of the vacuum without having to physically interact with it.
Noise Reduction: Some DIY robot vacuums can be quite noisy during operation. To make your cleaning experience more pleasant, consider adding noise reduction features. This can include soundproofing materials or modifications to the vacuum’s motor to reduce noise levels. This way, you can enjoy a quieter and more peaceful cleaning session.
Voice Control: If you have a smart home setup, integrating your DIY robot vacuum with voice control can be a game-changer. By connecting it to a voice assistant like Amazon Alexa or Google Assistant, you can simply use voice commands to start, stop, or schedule cleaning sessions. It adds convenience and a touch of modern technology to your cleaning routine.
By enhancing your DIY robot vacuum with these additional features and accessories, you can take your cleaning experience to the next level. Whether it’s remote control, virtual walls, mopping capabilities, noise reduction, or voice control, these upgrades can make your robot vacuum more efficient and enjoyable to use. With a little creativity and customization, you can truly personalize your cleaning assistant.
So go ahead, explore these options, and enjoy the benefits of a fully optimized DIY robot vacuum.
What Skills Do I Need To Build A Robot Vacuum And Mop Cleaner
To build a robot vacuum and mop cleaner, you would need a combination of skills in robotics, electronics, programming, and mechanical design. Specifically, the following skills would be essential:
- Robotics: Knowledge of motor control, sensor integration, and physical structure design.
- Electronics: Proficiency in soldering, circuit design, and microcontroller use.
- Programming: Ability to program navigation, obstacle avoidance, and cleaning functions.
- Mechanical Design: Skills in 3D modeling and creating the robot’s physical structure.
- Problem-solving: Ability to identify and address technical challenges.
- Materials: Sourcing motors, sensors, microcontrollers, and other electronic components.
Tools: Access to soldering irons, 3D printers, and other prototyping tools.
Conclusion
So now you know how to make a robot vacuum. You’ve successfully built your DIY robot vacuum! This clever creation saves you time and effort while ensuring a spotless home. Beyond convenience, it’s an educational and enjoyable project. Enjoy a cleaner, healthier living space and consider customizing it further. Embrace the convenience, free time, and cleaner home your DIY robot vacuum provides.
FAQs
What are some safety precautions to keep in mind while assembling the robot vacuum?
When assembling a robot vacuum, it’s important to prioritize safety. Follow these precautions: 1) Read the manual thoroughly. 2) Ensure the power is turned off. 3) Use caution when handling sharp or moving parts. 4) Keep children and pets away during assembly.
How long does it typically take to assemble a robot vacuum?
It typically takes a few hours to assemble a robot vacuum. Follow the instructions carefully, ensuring all parts are securely attached. Take breaks if needed and double-check your work for any mistakes.
Can I customize the design of my robot vacuum?
Yes, you can customize the design of your robot vacuum. There are many options available in the market that offer different colors, patterns, and features. You can choose the one that suits your preferences and style.
Are there any specific programming languages I need to know to program the robot vacuum?
To program a robot vacuum, you don’t need to know any specific programming languages. Most robot vacuums come with their own user-friendly software or mobile app that allows you to easily control and customize their cleaning patterns and schedules.
How often should I clean and maintain my DIY robot vacuum?
To keep your DIY robot vacuum running smoothly, it’s important to clean and maintain it regularly. By doing so, you can ensure optimal performance and longevity. Here’s a simple guide on how often you should clean and maintain your robot vacuum.
How many people own robot vacuums?
It was estimated that there were 14.2 million households with robotic vacuum cleaners in the United States in 2018. Around 14% of Americans own a robot vacuum, and 13% intend to buy one, which would press around 30 million into service in American homes
What was the first handheld vacuum?
The first handheld vacuum is often credited to Black & Decker, which introduced the “Dustbuster” in 1979, revolutionizing portable vacuum cleaning technology.
What material is a robot vacuum?
A robot vacuum is typically made of various materials, including plastic for the outer shell, rubber for the wheels, and metal or plastic for internal components such as the motor and sensors. The specific materials used can vary depending on the manufacturer and the model of the robot vacuum.
How to make DIY robot vacuum lidar?
To make a DIY robot vacuum with LiDAR (Light Detection and Ranging) technology, you can use affordable LiDAR sensors from sources such as vacuum robots or mechatronics/robotics projects. There are resources available, including videos and tutorials, that demonstrate how to use and hack these sensors for DIY robot vacuum applications.